Your Whirlpool refrigerator is a lifesaver, keeping your food fresh and cool all day long. But what if your refrigerator is starting to run less efficiently, or your food isn’t staying as cold as it used to? One possible culprit is dirty condenser coils.
Condenser coils are located at the bottom of your refrigerator, and they help to dissipate heat. Over time, dust and other debris can build up on the coils, making it harder for them to do their job. This can lead to a number of problems, including:
- Reduced refrigerator efficiency
- Higher energy bills
- Warmer food temperatures
- Increased risk of compressor failure
The good news is that cleaning your Whirlpool refrigerator coils is a quick and easy task that you can do yourself. In this guide, we’ll walk you through the steps involved in cleaning your coils, so you can keep your refrigerator running smoothly for years to come.
Understanding Condenser Coils
What Are Condenser Coils And Their Importance?
In order to effectively clean the condenser coils in your Whirlpool refrigerator, it is important to understand what they are and why they play a crucial role in the overall functioning of your appliance. Condenser coils are an essential component of the refrigeration system, responsible for releasing and dissipating the heat absorbed by the refrigerant. These coils are located either at the back or underneath the refrigerator, and their primary purpose is to remove heat from the interior and transfer it to the surrounding environment.
The importance of condenser coils lies in their ability to maintain the optimal temperature inside the refrigerator. When the coils become dirty or clogged with debris, their performance can be compromised. This can lead to the refrigerator being unable to cool down properly, resulting in potential food spoilage and increased energy consumption.
How Do Condenser Coils Work In A Whirlpool Refrigerator?
In a Whirlpool refrigerator, the condenser coils are typically located at the back of the appliance, behind a protective grille or panel. These coils are made up of a series of thin metal tubes that carry the refrigerant and are surrounded by aluminum fins, which help increase the surface area for improved heat dissipation.
When the refrigerant passes through the condenser coils, it enters in a high-pressure, high-temperature state. As the warm air from inside the refrigerator flows across the coils, the heat from the refrigerant is transferred to the air. This causes the refrigerant to condense back into a liquid state, ready to repeat the cooling cycle.
The cooling process relies on the proper functioning of the condenser coils. When they become dirty, dust, pet hair, and other debris can accumulate on the surface, acting as an insulator and hindering heat transfer. As a result, the refrigerator’s compressor has to work harder to maintain the desired temperature, leading to increased energy consumption and potential strain on the system.
Cleaning the condenser coils in your Whirlpool refrigerator is an essential part of regular maintenance and can contribute to its overall longevity and performance. Now that we understand the importance of condenser coils and how they work in a Whirlpool refrigerator, let’s explore the steps to effectively clean them.
Signs That Your Condenser Coils Need Cleaning
Identifying Common Issues Caused By Dirty Condenser Coils
Your refrigerator’s condenser coils play a crucial role in maintaining the optimum performance of your Whirlpool refrigerator. Over time, these coils can become clogged with dust, dirt, and debris, leading to various issues that can negatively impact the efficiency of your appliance.
Understanding the signs that indicate your condenser coils need cleaning is essential to ensure your refrigerator continues to operate at its best, keeping your food fresh and your energy bills low. Let’s explore some common issues caused by dirty condenser coils:
How To Determine If Your Whirlpool Refrigerator’s Condenser Coils Need Cleaning
Regular cleaning of condenser coils is vital for the optimal functioning of your Whirlpool refrigerator. While it is recommended to clean the coils at least twice a year, specific signs can help you determine if it’s time to clean them sooner:
1. Warm Exterior: One of the telltale signs that your condenser coils are dirty is the warm exterior of your refrigerator. If you notice that the sides or back of your fridge feel warmer than usual, it could indicate that the coils are unable to dissipate heat effectively due to the buildup of debris.
2. Increased Energy Consumption: Dirty condenser coils put a strain on your refrigerator’s compressor, making it work harder than necessary to maintain the desired temperature. This leads to increased energy consumption, which can be observed through higher electricity bills. Cleaning the coils regularly can help your fridge run efficiently and save energy.
3. Noisy Operation: As the condenser coils become clogged with debris, the refrigerator’s internal fans may have to work harder to circulate air. This can result in increased noise levels, causing your fridge to sound louder than usual. Cleaning the coils can help reduce the strain on the fans and restore quieter operation.
4. Insufficient Cooling: If you notice that your food is not staying as cold as it used to or if your refrigerator is struggling to maintain a consistent temperature, it could be a sign of dirty condenser coils. The buildup of dirt and dust can obstruct the coils’ ability to release heat, hampering the cooling process. Cleaning the coils can help restore efficient cooling and keep your food fresh for longer.
5. Longer Run Cycles: When your condenser coils are dirty, your refrigerator may operate for longer periods, leading to longer run cycles. This extended running time puts unnecessary strain on the compressor, resulting in increased wear and tear. Cleaning the coils regularly can help reduce run cycles and extend the lifespan of your refrigerator.
By keeping an eye out for these signs, you can determine when it’s time to clean the condenser coils in your Whirlpool refrigerator. Regular maintenance will not only help prolong the life of your appliance but also ensure it continues to operate efficiently, saving you money on energy bills in the long run.
Preparing For Cleaning
To ensure your Whirlpool refrigerator continues to function optimally, it is crucial to regularly clean its condenser coils. Over time, these coils can accumulate dirt, dust, and other debris, hindering the refrigerator’s cooling efficiency. Before plunging into the cleaning process, it’s important to gather the necessary tools and materials and take the necessary safety precautions.
This will help you clean the condenser coils effectively without risking any damage to yourself or the refrigerator.
Gathering The Necessary Tools And Materials For The Cleaning Process
Before starting the cleaning process, it’s essential to gather the tools and materials you’ll need. Having everything prepared in advance will save you time and ensure a smooth cleaning experience. Here are the tools and materials you’ll need:
- Clean cloth or brush: A soft cloth or brush that won’t damage the coils is essential for removing dirt and debris.
- Vacuum cleaner with a brush attachment: The brush attachment will help you suck up any loose dirt or dust.
- Fin cleaning brush: A fin cleaning brush with long bristles is ideal for reaching into the narrow spaces between the coils.
- Protective gloves: It’s always a good idea to wear protective gloves to keep your hands safe from any sharp edges or cleaning chemicals you may encounter during the process.
- Air compressor or compressed air: An air compressor or compressed air can be used to blow out the dust and debris from the coils.
Safety Precautions To Take Before Starting The Cleaning Process
Before you begin cleaning the condenser coils, it’s crucial to take the necessary safety precautions to ensure your well-being and prevent any damage. Here are some safety precautions to keep in mind:
- Disconnect the power: Before attempting any maintenance or cleaning on your refrigerator, always disconnect the power to prevent any electric shocks or accidents.
- Wear safety goggles: When cleaning the coils, there is a risk of dust or debris flying into your eyes. Wearing safety goggles will provide essential eye protection.
- Keep the area well-ventilated: Adequate ventilation is necessary during the cleaning process to prevent the buildup of fumes or chemicals. Open windows or doors to ensure fresh air circulation.
- Unplug the refrigerator: To avoid any accidental operation of the refrigerator while cleaning, unplug it from the power source.
- Do not use sharp objects: Avoid using sharp tools or objects to clean the coils, as this can cause damage. Stick to soft brushes and clothes instead.
By taking these safety precautions and ensuring you have all the necessary tools and materials, you are ready to move on to the cleaning process. Keep in mind that regular maintenance and cleaning of your Whirlpool refrigerator’s condenser coils will not only improve its performance but also extend its lifespan.
Credit: www.homeserve.com
Step-by-step Cleaning Process
Proper maintenance of your Whirlpool refrigerator is essential to ensure its optimal performance. One crucial aspect of refrigerator maintenance is cleaning the condenser coils. Over time, these coils can become clogged with dust, debris, and even stubborn dirt, affecting the refrigerator’s cooling efficiency.
In this step-by-step guide, we will walk you through the process of cleaning the condenser coils in your Whirlpool refrigerator, helping you keep it running smoothly and efficiently.
How To Access The Condenser Coils In A Whirlpool Refrigerator
Before you begin cleaning the condenser coils, it is important to know how to access them. In the case of a Whirlpool refrigerator, the condenser coils are located either at the back of the unit or beneath the refrigerator behind a removable kickplate. Refer to your refrigerator’s user manual for specific instructions on locating the condenser coils.
Once you have identified their location, follow the steps below to begin the cleaning process.
Removing Dust And Debris From The Condenser Coils
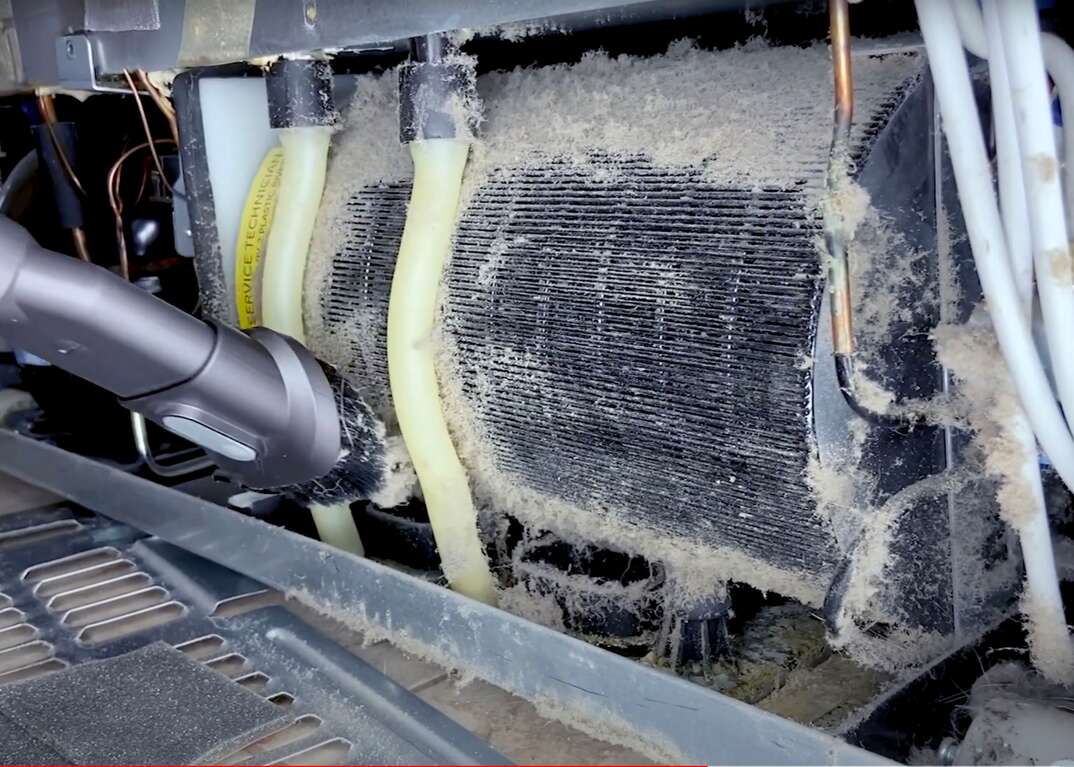
To ensure proper airflow and cooling efficiency, start by removing any visible dust and debris from the condenser coils. You can use a soft brush or a vacuum cleaner with a brush attachment for this task. Gently brush or vacuum the coils in an up-and-down or side-to-side motion, removing as much dust and debris as possible. Take care not to apply excessive force or damage the coils in the process.
Cleaning The Condenser Coils Using A Vacuum Or Brush
After removing the surface dust and debris, it’s time to give the condenser coils a more thorough cleaning. If you are using a vacuum cleaner with a brush attachment, switch to the crevice or brush attachment. Alternatively, if you have a specialized coil cleaning brush, you can use that as well.
Carefully insert the brush or vacuum attachment into the tight spaces between the coils and gently clean out any remaining dirt or dust. Be thorough but gentle to avoid bending or damaging the coils.
Addressing Stubborn Dirt And Grime On The Coils
In some cases, the condenser coils may have stubborn dirt or grime that is not easily removed with a brush or vacuum. In such instances, you can prepare a solution of mild detergent and warm water. Dampen a soft cloth with the solution and gently wipe the coils, focusing on the areas with buildup.
Ensure the cloth is not dripping wet to prevent water from entering the refrigerator components. Once cleaned, use a separate cloth dampened with clean water to rinse off any residue.
Cleaning The Surrounding Areas Of The Condenser Coils
In addition to cleaning the condenser coils themselves, it is essential to clean the surrounding areas to maintain optimal airflow. Remove any dust or debris from the fan blades and ensure there are no obstructions or blockages in the vent openings. You can use a soft brush or vacuum cleaner to clean these areas as well.
Once you have completed the cleaning process, carefully reattach the kickplate or move the refrigerator back into its original position.
Maintenance Tips To Prevent Future Build-up
Regular maintenance of condenser coils in your Whirlpool refrigerator is essential to keep it running efficiently and to prevent future build-up. By following these simple tips, you can ensure that your refrigerator stays in top condition for years to come.
Tips For Regular Maintenance Of Condenser Coils
- Keep the area around the refrigerator clean and free from dust and debris. This will help prevent dust from settling on the coils and obstructing airflow.
- Regularly check the gaskets on the refrigerator door to ensure they are sealing properly. If the gaskets are worn or damaged, cold air can escape, causing the refrigerator to work harder and potentially leading to dirty condenser coils.
- Inspect the refrigerator vents and make sure they are not blocked or obstructed. Blocked vents can prevent proper airflow, which can lead to the accumulation of dirt and grime on the condenser coils.
- Consider investing in a refrigerator coil brush or vacuum with a brush attachment. These tools can help you clean the coils more effectively by removing dirt and debris that may be stuck in hard-to-reach areas.
How Often Should You Clean The Condenser Coils In A Whirlpool Refrigerator?
The frequency of cleaning your Whirlpool refrigerator’s condenser coils depends on various factors, such as the environment in which the refrigerator is kept and how often it is used. As a general guideline, it is recommended to clean the coils once every six months to ensure optimal performance. However, if you notice a significant build-up of dirt or if your refrigerator is located in a dusty environment, you may need to clean the coils more frequently.
Frequently Asked Questions For How To Clean Condenser Coils In Whirlpool Refrigerator
How Often Should You Clean The Condenser Coils In Your Whirlpool Refrigerator?
It is recommended to clean the condenser coils of your Whirlpool refrigerator at least once every six months. Regular cleaning helps improve energy efficiency and prevent costly repairs caused by dust and debris buildup.
What Tools And Materials Do You Need To Clean Condenser Coils In A Whirlpool Refrigerator?
To clean condenser coils in your Whirlpool refrigerator, you will need a coil brush, vacuum cleaner with a brush attachment, mild detergent or coil cleaner, and a soft cloth. These tools and materials will help you effectively remove dirt and grime from the coils.
How Do You Clean The Condenser Coils In A Whirlpool Refrigerator?
To clean the condenser coils in your Whirlpool refrigerator, first, unplug the appliance. Use a coil brush to gently remove dust and debris from the coils. Then, use a vacuum cleaner with a brush attachment to clean the remaining dirt.
Finally, wipe the coils with a cloth dampened in mild detergent or coil cleaner.
Can You Clean The Condenser Coils In A Whirlpool Refrigerator Without Unplugging It?
No, it is necessary to unplug your Whirlpool refrigerator before cleaning the condenser coils. Unplugging the appliance ensures safety and prevents any damage to the coils or the refrigerator’s electrical components. Always prioritize safety when performing any maintenance tasks on your refrigerator.
Conclusion
Maintaining clean condenser coils in your Whirlpool refrigerator is crucial for optimal performance and energy efficiency. By following the step-by-step guide outlined in this blog post, you can effectively remove dirt and debris buildup, ensuring your fridge continues to run smoothly.
Remember to regularly clean the coils to prolong the lifespan of your appliance and prevent potential breakdowns. Happy cleaning!
Hello Readers, I am Mechanic Shuvo, a seasoned refrigerator solution expert with over 11 years of hands-on experience in the field. Throughout my career, I've dedicated myself to understanding the ins and outs of refrigeration systems, honing my skills as a refrigerator mechanic. My passion for these appliances led me to create the website "refrigeratorsolutionsguide.com," where I aim to share my wealth of knowledge and expertise with others.
Over the years, I've encountered a wide range of refrigerator issues and have successfully resolved them all. From common problems like temperature fluctuations and strange noises to more complex technical issues, I've seen it all. Through my website, I hope to provide practical solutions, insightful tips, and guidance to help you keep your refrigerators running smoothly.


