
Is your Whirlpool refrigerator light bulb not working? Don’t worry, replacing it is a simple task that you can do yourself in just a few minutes. The first step is to remove the light bulb cover.
Refrigerator light bulb covers are typically made of plastic and are designed to protect the light bulb from damage and to diffuse the light. Over time, light bulb covers can become dirty or cracked, and they may need to be replaced.
In this article, we will show you how to remove a Whirlpool refrigerator light bulb cover.
Understanding The Importance Of Removing The Light Bulb Cover
The light bulb cover is an essential component of a Whirlpool refrigerator. It serves two main purposes: protecting the bulb and distributing light evenly throughout the refrigerator. While the cover is designed to be durable and long-lasting, there may come a time when it needs to be removed for maintenance or replacement.
The purpose of the light bulb cover in refrigerators The light bulb cover in a Whirlpool refrigerator has a crucial role to play. It shields the bulb from any accidental damage, such as knocking against objects or coming into contact with food items. The cover acts as a barrier, ensuring the bulb remains intact and functional for an extended period. Additionally, the light bulb cover is responsible for distributing light evenly throughout the refrigerator.
By covering the bulb, the light is diffused and spread across the entire compartment, allowing you to see the contents clearly, regardless of their placement.
Why it is necessary to remove the cover for maintenance and replacement?
Although the light bulb cover is made to withstand wear and tear, there are instances where its removal becomes necessary. Maintenance tasks like cleaning the cover or replacing a burnt-out bulb require removing the cover. Proactively maintaining and replacing the light bulb cover ensures optimal visibility within the refrigerator, making it easier to locate items and organize your groceries efficiently.
Moreover, cleaning the cover regularly helps to prevent dirt, dust, and grime from accumulating. A dirty cover can hinder the distribution of light and make the interior of the refrigerator appear dimmer than usual. Therefore, removing the cover for thorough cleaning ensures optimal functionality and brightness.
Replacing the light bulb cover is equally important. Over time, the cover may become cracked, discolored, or defective due to constant exposure to temperature fluctuations and moisture.
By removing and replacing the cover, you can restore the functionality and aesthetics of your refrigerator, ensuring a visually appealing and well-lit interior. Remember, when removing the light bulb cover, it’s essential to handle it with care. Use gentle force and follow the manufacturer’s instructions to avoid damaging the cover or causing any injuries.
Tools And Preparations For Removing The Whirlpool Refrigerator Light Bulb Cover
If you need to replace the light bulb in your Whirlpool refrigerator, you’ll first need to remove the light bulb cover. This is a simple task that you can easily do yourself, but you’ll need a few essential tools and take some safety precautions before getting started. Here’s what you’ll need and the things you should do before removing the Whirlpool refrigerator light bulb cover.
Essential Tools Needed For The Task
Before you begin, gather these essential tools to ensure a smooth and hassle-free process:
| Tools |
| Screwdriver |
| Cloth |
A screwdriver is the main tool you’ll need to remove the Whirlpool refrigerator light bulb cover. Ensure you have the appropriate size and type of screwdriver as per your refrigerator’s model. Additionally, it’s a good idea to have a cloth or gloves on hand to protect your hands and provide a better grip while handling the light bulb and cover.
Safety Precautions To Take Before Starting The Process
Before you start removing the light bulb cover from your Whirlpool refrigerator, take the following safety precautions:
- Unplug the refrigerator: To avoid any risk of electric shock, it’s important to unplug the refrigerator from the power source before proceeding. This will ensure your safety throughout the entire process.
- Allow the bulb to cool down: The light bulb might be hot if it has been in use for a while. Wait for the bulb to cool down completely before attempting to remove the cover to prevent burning your fingers.
- Turn off the interior light: If your refrigerator has an interior light switch, make sure it is turned off before proceeding. This will prevent accidental blinding or electric shock while working on the light bulb cover.
By following these safety precautions, you’ll minimize any potential risks and ensure a safe environment for removing the Whirlpool refrigerator light bulb cover. Now that you have the necessary tools and have taken the necessary precautions, you’re ready to get started!
Step-by-step Guide To Removing The Whirlpool Refrigerator Light Bulb Cover
Gone are the days of fumbling around with your Whirlpool refrigerator’s light bulb cover. With this step-by-step guide, you’ll learn how to remove the light bulb cover with ease. Whether you’re replacing a burnt-out bulb or just need to clean the cover, we’ve got you covered. Follow these simple instructions, and you’ll have that cover off in no time.
Locating The Light Bulb Cover In The Refrigerator
The first step is to locate the light bulb cover inside your Whirlpool refrigerator. This will vary depending on the model and design of your fridge, but it’s typically found near the top or back of the refrigerator compartment. Take a moment to inspect the interior and locate the cover before proceeding to the next step.
Removing Any Obstacles Or Shelves That May Obstruct the Access
Before attempting to remove the light bulb cover, it’s important to clear out any obstacles or shelves that may obstruct your access. Depending on the design of your refrigerator, this may involve removing the top shelf or sliding the adjacent shelves out of the way. By creating ample space, you’ll have a clear path to remove the light bulb cover.
Identifying The Type Of Cover To Determine The Removal Technique
Whirlpool refrigerators may have different types of light bulb covers, such as snap-on covers, twist-off covers, or covers held in place by screws. Before proceeding, take a moment to identify the type of cover on your specific refrigerator model. This will help you determine the appropriate removal technique and avoid any unnecessary damage.
Step-by-step Instructions For Removing Different Types Of Covers
Now, let’s dive into the step-by-step instructions for removing different types of light bulb covers:
| Type of Cover | Removal Technique |
| Snap-on Cover | 1. Insert a small flathead screwdriver into the gap between the cover and the refrigerator wall. 2. Gently pry the cover away from the wall using a twisting motion. 3. Continue prying until the snap-on tabs disengage and the cover comes free. |
| Twist-off Cover | 1. Grip the cover firmly with one hand. 2. Rotate the cover counterclockwise until it loosens. 3. Lift the cover away from the wall once it is fully loosened. |
| Cover Held in place by Screws | 1. Use a screwdriver to remove the screws securing the cover to the refrigerator. 2. Carefully pull the cover away from the wall once the screws are removed. Keep the screws in a safe place. |
Refer to your Whirlpool refrigerator’s user manual for specific instructions tailored to your model if you encounter any difficulties during the removal process.
Tips For Handling Delicate Or Stubborn Covers
If you’re dealing with a delicate or stubborn light bulb cover, try these tips to make the removal process smoother:
- Apply gentle pressure when prying or twisting to avoid damaging the cover or refrigerator.
- If a snap-on cover doesn’t budge, use a hairdryer to warm the area slightly. The warm air can help loosen the plastic and make it easier to remove.
- For twist-off covers that are stuck, use a rubber jar opener or cloth for a better grip and increased leverage.
- If a cover is held in place by screws that won’t turn, try applying some penetrating oil to the screw threads. This can loosen rust or dirt that may be causing the resistance.
By following these tips and instructions, you’ll have no trouble removing the Whirlpool refrigerator light bulb cover.
Cleaning And Maintaining The Whirlpool Refrigerator Light Bulb Cover
Welcome to our blog post on how to clean and maintain the Whirlpool Refrigerator Light Bulb Cover. Regular cleaning and maintenance of this component is important to ensure optimal performance and longevity of your refrigerator. Most people tend to overlook this area, but a clean and well-maintained light bulb cover can enhance the overall efficiency and hygiene of your refrigerator.
In this section, we will discuss the importance of regular cleaning and maintenance, provide methods and tips for cleaning the cover without causing damage, and explore other components to clean while accessing the light bulb cover area.
Importance Of Regular Cleaning And Maintenance
The Whirlpool Refrigerator Light Bulb Cover may not seem like a significant component, but it plays a crucial role in providing adequate lighting inside your refrigerator. Regular cleaning and maintenance of the cover is essential for several reasons:
- Improved visibility: A clean light bulb cover allows the maximum amount of light to pass through, ensuring proper visibility of the refrigerator contents. This makes it easier to locate and access items, especially during nighttime.
- Elimination of odors: The inside of a refrigerator can sometimes develop unpleasant odors. Regular cleaning of the light bulb cover helps eliminate any trapped food particles or spills that may contribute to these odors, resulting in a fresher-smelling refrigerator.
- Prolonged lifespan: Dust, debris, and grease can accumulate on the light bulb cover over time, leading to reduced efficiency and potential damage. Regular cleaning prevents the buildup of these contaminants, helping to extend the lifespan of the cover.
Methods And Tips For Cleaning The Cover Without Causing Damage
To clean your Whirlpool Refrigerator Light Bulb Cover effectively, follow these methods and tips:
- Turn off the refrigerator: Before cleaning the light bulb cover, ensure the refrigerator is powered off. This prevents any electrical mishaps and allows the cover to cool down.
- Remove the cover: Depending on the refrigerator model, the light bulb cover may be removable or have a twist-off mechanism. Refer to the manufacturer’s instructions to safely remove the cover without causing any damage.
- Use mild soap and warm water: Prepare a solution of mild soap and warm water. Dip a soft cloth or sponge into the soapy water and gently wipe the cover. Avoid using abrasive cleaners or harsh chemicals, as they can damage the cover.
- Dry thoroughly: After cleaning the cover, ensure it is completely dry before reattaching it to the refrigerator. Moisture can lead to mold or other issues if not adequately dried.
- Regular cleaning schedule: Create a regular cleaning schedule for the light bulb cover to maintain its cleanliness. Depending on usage and environmental factors, aim to clean the cover every few months.
Other Components To Clean While Accessing The Light Bulb Cover Area
While accessing the light bulb cover area, take the opportunity to clean other components that are often overlooked. These include:
- Interior walls and shelves: Wipe down the interior walls and shelves of your refrigerator using a damp cloth or sponge. Remove any spills, stains, or food residue to maintain a clean and hygienic environment for your food.
- Door seals: Inspect and clean the door seals to ensure they are free from debris and sticky residues. This helps maintain a proper seal, preventing cold air leaks and promoting energy efficiency.
- Condenser coils: If accessible, vacuum or brush the condenser coils to remove dust and dirt buildup. This improves the overall cooling efficiency of the refrigerator.
- Water and ice dispenser: Clean the water and ice dispenser area using a mild detergent and warm water. Wipe away any buildup of mineral deposits or sticky residue to ensure fresh and clean water/ice.
By incorporating these additional cleaning tasks into your routine, you can ensure thorough maintenance of your refrigerator while accessing the light bulb cover area.
Replacing The Light Bulb And Putting The Cover Back On
When it comes to maintaining your Whirlpool refrigerator, replacing a light bulb might seem like a minor task. However, it is crucial to do it correctly to ensure proper lighting inside your refrigerator. In this guide, we will focus on the process of replacing the light bulb and putting the cover back on.
We will discuss choosing the right replacement light bulb, proper techniques for replacing the bulb without damaging the cover, and securing the cover back in place correctly.
Choosing The Right Replacement Light Bulb For Your Whirlpool Refrigerator
Before you begin the process of replacing the light bulb in your Whirlpool refrigerator, it is essential to choose the right replacement bulb. Using an incorrect bulb can lead to inefficient lighting or even potential damage to the refrigerator.
To determine the appropriate replacement bulb, refer to the user manual or the labeling on the existing bulb. Look for the specific bulb type and wattage that is recommended for your Whirlpool refrigerator model.
Note: Make sure to purchase a bulb that matches the same specifications as the original one.
Proper Techniques For Replacing The Bulb Without Damaging The Cover
Now that you have the correct replacement light bulb, it’s time to replace the old one without damaging the cover. Follow these steps to ensure a smooth and hassle-free process:
- Unplug the refrigerator: For safety purposes, always unplug the refrigerator from the power source before replacing the light bulb. This will prevent any electric shocks or accidents.
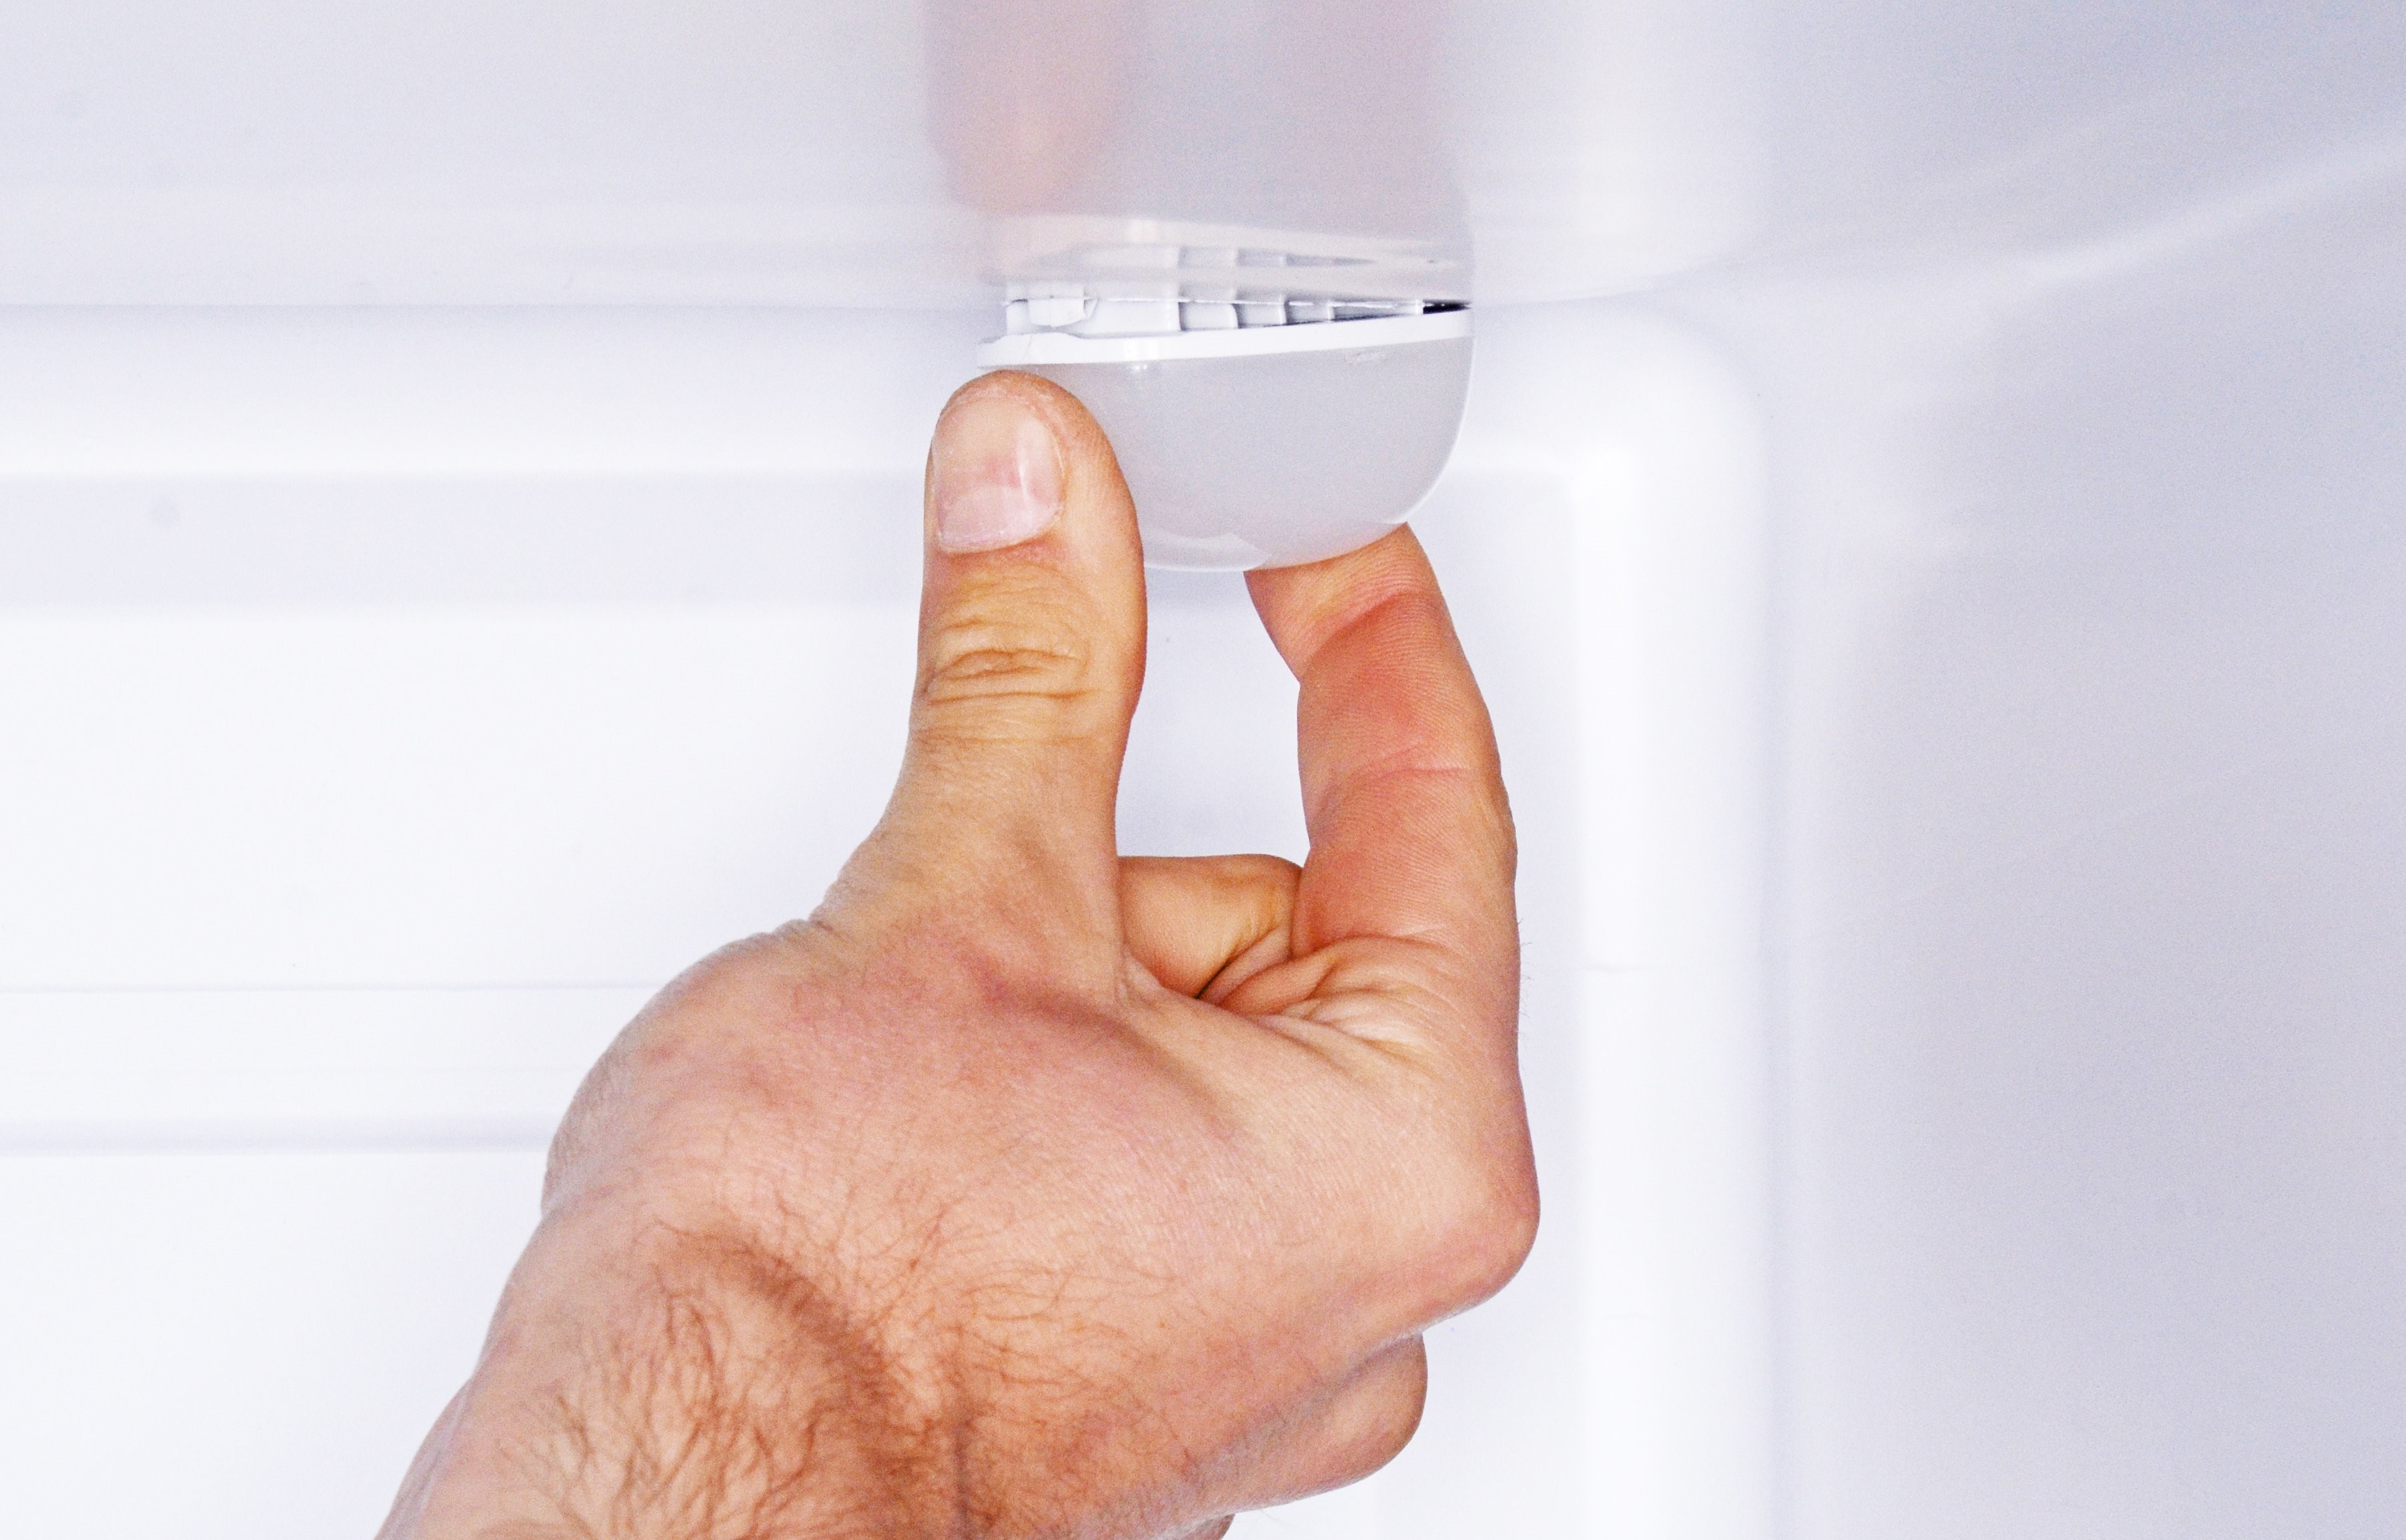
- Locate the bulb cover: The light bulb cover in your Whirlpool refrigerator is usually located on the ceiling or at the back of the refrigerator. Gently remove the cover by either sliding it off or twisting it counterclockwise, depending on the model.
- Remove the old bulb: Carefully unscrew the old bulb from its socket by turning it counterclockwise. Avoid excessive force to prevent any breakage.
- Install the new bulb: Take the new bulb and screw it into the socket by turning it clockwise. Make sure it is secured firmly but avoid overtightening.
Securing The Cover Back In Place Correctly
With the new light bulb in place, it’s then time to put the cover back on. Properly securing the cover ensures that it remains intact and protects the light bulb from any external factors.
To secure the cover back in place:
- Align the cover: Before placing the cover back, make sure it aligns with the slots or grooves on the refrigerator. This ensures that it fits snugly into place.
- Slide or twist the cover: Depending on the type of cover, carefully slide it back into position or twist it clockwise until it locks into place. Ensure that it is secure and does not wobble.
- Plug the refrigerator in Finally, plug the refrigerator back into the power source and turn it on. Check if the new light bulb is functioning properly by opening the refrigerator door.
By following these simple steps, you can easily replace the light bulb in your Whirlpool refrigerator and put the cover back on without any hassle. Remember, always prioritize safety and use the correct replacement bulb to maintain optimal lighting inside your refrigerator.
Credit: storables.com
Frequently Asked Questions Of How To Remove Whirlpool Refrigerator Light Bulb Cover
How Do You Remove The Whirlpool Refrigerator Light Bulb Cover?
To remove the Whirlpool refrigerator light bulb cover, start by locating the cover at the top of the fridge compartment. Gently push the cover towards the back of the refrigerator, then rotate it counterclockwise to unlock. Once unlocked, carefully pull the cover out to access the light bulb.
Can I Remove The Light Bulb Cover Without Any Tools?
Yes, you can remove the Whirlpool refrigerator light bulb cover without any tools. The cover is designed for easy removal by hand. Simply follow the steps outlined in the previous answer to remove the cover and access the light bulb.
How Often Do I Need To Replace The Light Bulb In My Whirlpool Refrigerator?
On average, the light bulb in a Whirlpool refrigerator should last about 1 to 2 years. However, this can vary depending on usage and other factors. If the light bulb burns out or is not working properly, it should be replaced to ensure adequate lighting inside the refrigerator.
What Type Of Light Bulb Should I Use To Replace The One In My Whirlpool Refrigerator?
To replace the light bulb in your Whirlpool refrigerator, use a bulb with the same wattage and fitting. Typically, a 40-watt appliance bulb with a standard E26 base is compatible. However, it is always recommended to refer to the appliance’s manual for specific information on replacement bulbs.
Conclusion
Removing the light bulb cover of a Whirlpool refrigerator is a simple task that requires just a few steps. By following the instructions provided in this blog post, you can easily access and replace the light bulb in your fridge.
Remember to always unplug the refrigerator and handle the bulb with care to prevent any accidents. With this knowledge, you can ensure a well-lit and functional refrigerator.
Hello Readers, I am Mechanic Shuvo, a seasoned refrigerator solution expert with over 11 years of hands-on experience in the field. Throughout my career, I've dedicated myself to understanding the ins and outs of refrigeration systems, honing my skills as a refrigerator mechanic. My passion for these appliances led me to create the website "refrigeratorsolutionsguide.com," where I aim to share my wealth of knowledge and expertise with others.
Over the years, I've encountered a wide range of refrigerator issues and have successfully resolved them all. From common problems like temperature fluctuations and strange noises to more complex technical issues, I've seen it all. Through my website, I hope to provide practical solutions, insightful tips, and guidance to help you keep your refrigerators running smoothly.